Posts Tagged ‘motor board’

h1

Not every project works out

May 15, 2014

I don’t think we talk about failure enough. Sure, everyone says “you have to fail, it is the best way to learn” but not one likes to talk about it.

I thought about sharing a big failure story but I think, in the end, I’m not going to because it is also sad.

Still, I can’t just close this and tuck it into my drafts folder (that is a scary and slightly hilarious place) so I’ll tell you about this thing I thought “I’ll just hack that together while I’ve got free time”.

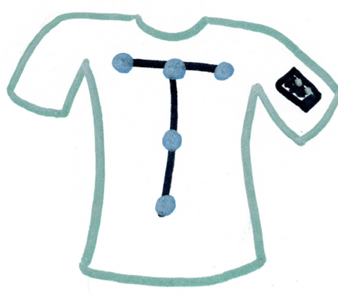
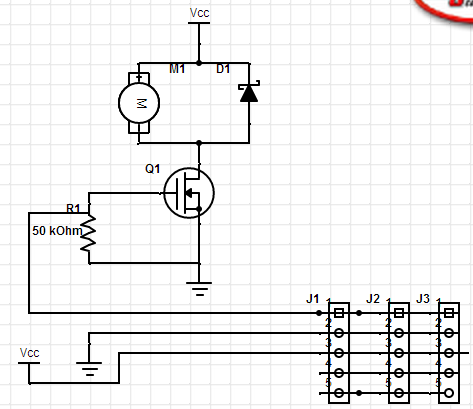
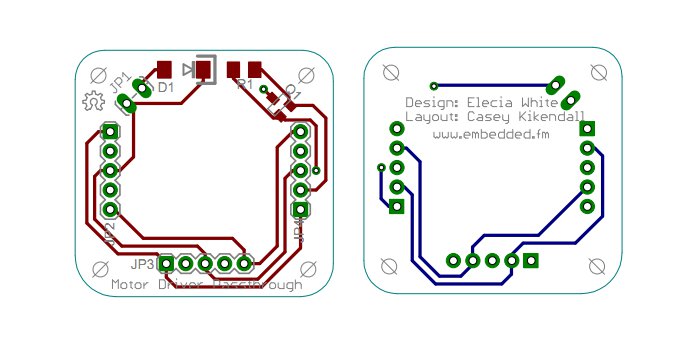
I made those motor boards (and I’m not ready to launch myself in to working on my posture shirt (though I probably should)). And I’m waiting for more hardware to make another ayok widget. But I do have the little dog stuffed animal, now with an RGB LED.

What if it could snore? Or sort of breath? Or have a heartbeat? Not for the ayok feature, just because it can be really comforting to be near something that is alive-ish and has no expectations. (I have real dogs, they have expectations. And my beagle thinks I’m stupid so that really helps my ego.)

Anyway, I got the idea, have the hardware, and thought it would make a cute little demo.  I also have this thought of trying to use the coin cells to con my hand into believing it touched something (briefly).

I went for the Arduino so I could post it on github, write about it a bit. I had a slight plan to show the result to someone, but not a solid thing.

I coded up a little command interpreter for Arduino’s serial port. Then I played with PWM, discovering that the timer configuration is annoyingly nontrivial. I was surprised as Electric Imp and mbed both hide the guts of PWM. I read timer sections of the ATmega328 datasheet, remembering how much I prefer other companies’ method of information organization.

I made commands for changing the duty cycle and the frequency. I make a little script parser so I could have a snore be inhale, snork, pause, exhale, pause, changing the duty cycle and frequency for each stage.

But it didn’t work that well. The snore wasn’t all that consistent and the code freaked out sometimes. I fixed the freak-out by modifying my PWM code to use the overflow interrupt to reload the registers. But it still wasn’t good.

And then my computer’s screen started acting really strangely, strangely in time with the PWM going on and off. I had the Arduino and motor board powered from my USB port.  The motor only takes ~0.5A and the Arduino isn’t a big load. Maybe it was just how dirty the power got. Or maybe it was completely unrelated.

That was the last straw. My results weren’t good. The processor was more annoying to use than I expected. My end goal is fuzzy (and not in a cute-fuzzy sort of way).

Motivating myself to do these projects requires me to like the project. Sure, there were times when the ayok widget was less than fun, debugging can be a grind. But this was just a mess all over. The most fun I had was with the command line parser.

I could persist through this, maybe make something I don’t hate. Probably switch to an mbed to drive it, use a USB hub or external power, maybe get a selection of small motors. But I don’t really want to.

The failure here is not in stopping. The failure is that I’m not learning anything.

I know that with the right motor and PWM tuning I can get snoring working (I’ve done it before). I’m confident heartbeat isn’t tough. And I’m pretty sure I won’t be able to make a determination on my haptic hand-touching-wall thing because it won’t work and I won’t know whether to blame the mounting or the code or the unreality of the situation.

So, it is a little fail and, accordingly, a little depressing.

And I’m not sure what I’m going to do next. I’m hoping to get a contract soon (maybe today, we’ll see). But I’m also borrowing a BeagleBone Black because I’ve been wanting to try it out. I don’t know what my plan is with that. I’ve also been pondering putting ucLinux on a Cortex-M3 devkit (NXP or ST? Or something else?). It is always nice to see how OSs go on processors. I could compare it to FreeRTOS or some of the other small OSs. Build up a library of what’s good for what. But that sounds soooo boring.

Without a goal, I am far more likely to get discouraged.


h1

Easier and harder

March 17, 2014

Armed with my gerbers, I went to OSHPark, the place where I’ve heard small quantities of small boards can be had at a reasonable price. It starts with a nice welcome page. I pushed the giant Get Started Now button, thinking I’ll need a log in. Nope, it gets started, wanting me to upload my files.

We’ve only just met, that seems a little fast.

I tried to upload files but it failed because I tried to upload the first of the many files in my newly unzipped directory. Happily, it told me to load the zip so I deleted my expanded folder and just loaded the zip file I got from electrical engineer Casey. Clearly, this site was designed for idiots. Which is great in this case.

When I uploaded the zip, it didn’t have one of the files but it told me which one was missing. I emailed Casey. But then, as I was procrastinating kitting parts decided to write up these experiences, I read more of the text surrounding the large buttons on OSHPark. It said I can put in the brd file. I saw one of those in the source directory (as opposed to the Gerbers zip).

This succeeded. Faced with a “name it and give us your email”, I had to choose Continue (the only other option was start over). The buttons were inviting but I felt like I was herded along the path.

The site showed the different layers, similar to what Casey had sent. They looked good. Now, Approve or Approve and Order? I wanted to order them… but how much will it be? They didn’t (yet) have payment info so cancelling was possible.

Oh! Check this out, on the next page it said:

Your design will cost $6.45 per set of three.

Squee! I can buy them! They aren’t very expensive. I have to buy in units of 3… well, I thought it would be $40 for 10 or 15 so… let’s do 15 ($32.25). And free shipping? Cool!

Seriously, this is too easy, it has to fail catastrophically any second now. Typed in my credit card number (obviously this is a business expense!)… now there is email from their bot and a receipt in my email account.

I just bought boards. Wow. That’s pretty cool. So easy a software engineer could do it.


h1

Releasing boards

March 17, 2014

The next few weeks are free of paying work (I do hope it is only the next few weeks but I am really glad to have a few weeks off).

I’m finally getting back to my own projects. The are-you-ok widget is probably the big one but before I get back to there, I’m releasing boards for my own project. Oh, some back story first:

I want a little motor board.

Actually, stepping further back… I want to build a tshirt that will help with my posture while sitting at a computer. The prototype is a T across the back, ending on each shoulder. There are three points along the top and three down the middle (with one share so there are five points). Each point has an accelerometer and a motor and connectors.Posture Shirt Sketch


I want to pass PWR, GND, SDA, SCL to all five sensors somewhat using the motor boards as a way to conduct and split the signal. Also on the motor board is, well, a motor: a  small coin cell sized motor.

I want to turn the motor on via GPIO which doesn’t have enough current to direct drive the motor so I need a MOSFET.  [Processors can’t drive motors directly because they don’t have enough oomph. The processor connects to the MOSFET which acts like a switch. Then the processor says “on”, the MOSFET turns the motor on, sourcing the power from another line (the voltage from the battery).]

Here is the schematic, using Digikey’s SchemeIt. Unfortunately, SchemeIt is not something I can use to send to a board (PCB) fabrication house. [That would be like drawing the outside of a house in detail but leaving the inside as an exercise to the builder.]

Motor Circuit Capture

I have three connectors on the schematic, if the board is square, then these are on the East, West, and South sides. You can see the connection pass through to each connector.

I’ve wanted these boards for a long time, ever since I tried to make this (pretty simple) circuit myself. I’m not a good technician. I don’t have great soldering skills. What is worse, if it doesn’t involve a processor, I’m not very good at debugging hardware. So that was a swing and a miss. 

However, I have this podcast so I whined about it on the podcast. Well, actually, I wanted to know which electrical CAD software I should try (one that isn’t many thousands per seat). The answer is KiCAD but a listener said he could layout the board for me. And Casey did.

Motor Board Layers

He finished in early December. And here we are in mid March. I am so embarrassed by the delay. One thing just led to another: new and difficult contract, the holidays, vacation, cold, working hard to make up for missed time, the embedded system conference deadlines. And with many such projects, once I got a couple weeks behind, instead of rising to the top, it just got buried.

However, getting buried is no excuse. I’m returning to dust it off and finish it. Having worked now with higher power motors (and with FETs and how to blow them up), I’m a little more confident in my circuit.

Now it is time for a few of the difficult parts. I have released boards to fab and kitted parts but that was a long time ago. I’m really nervous but I don’t have a good reason for it. This isn’t going to cost thousands of dollars, it is pretty cheap overall. I suspect the nerves are from it being a new thing and I’m doing it more in public so failure casts a wider shadow. I suppose “suck it up” is the only right answer to those feelings.

Things to do:

  • Put it on github. This is an open source project, always was intended to be.
  • Go to OSHPark to get boards fabricated, release the design files to them (the gerbers).
  • Order parts from Digikey.

My goal is to get those done today. Then I’ll wait a couple weeks and put it all together. I’d better get to work.